Search This Blog

Showing posts with label powershell script. Show all posts

Friday, March 27, 2015

Exchange Inventory Powershell Script

Not SCOM related, but I cobbled together a powershell script that gives useful information for your exchange inventory. In particular, I was looking to re-balance my exchange databases and wanted to get the particulars of all my user mailboxes. I find that using using the alias when running some of the move commands is easier. The script will provide you with the following information:
  • Users's display name
  • Total size of the user's mailbox
  • The primary SMTP address for the user
  • The user's alias
  • The database on which the mailbox is located
By tweaking fields in the PSObject section, you can display or remove additional information, so long as that information is part of one of the other calls, like get-recipient or get-mailboxstatistics. As an example, the original script I found did not pull the database information, so I added that field in.

$(Foreach ($mailbox in Get-recipient -ResultSize Unlimited -RecipientType UserMailbox){
$Stat = $mailbox | Get-MailboxStatistics | Select TotalItemSize,ItemCount
                New-Object PSObject -Property @{
                DisplayName = $mailbox.DisplayName
                TotalItemSize = $Stat.TotalItemSize
                PrimarySmtpAddress = $mailbox.PrimarySmtpAddress
                Alias = $mailbox.Alias
                Database = $mailbox.Database}
}) | Select DisplayName,TotalItemSize,PrimarySmtpAddress,Alias,Database

Friday, November 15, 2013

SCOM 2012 Powershell - Retrieving a List of Computers in a Group

Had to search for a batch file that is on one of the many SQL servers we have in the environment. First inclination was, let me pull the systems from SCOM since it has all our SQL servers.

Poked around the interwebs a while and noticed a lot of scripts had references to 2007 commands that hadn't been updated to 2012. Here's the basic steps taken to get my group of SQL servers. You could perform the same task on pretty much any group in the same manner.

  • Open the Operations Manager Shell powershell console

Image illustratin the correct System Center 2012 Operations Manager Shell to open for running the powershell commands
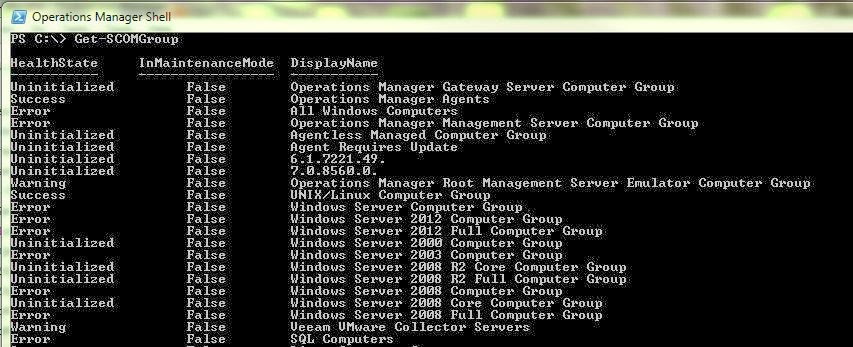
  • Type in : Get-SCOMGroup
Image shows the sample output of running the SCOM 2012 Get-SCOMGroup command in powershell
  • Search for the group you want to retrieve members from
  • Now type in: $Group = Get-SCOMGroup |  where {$_.DisplayName -eq "SQL Computers"} (or insert the group your looking for instead of SQL Computers")
Image illustrates running the Get-SCOMGroup command with a filter for a specific group and assigning to a variable

  • Next, type in: $Members = $Group.GetRelatedMonitoringObjects()
 
Illustrates the use of the command GetRelatedMonitoringObjects() for retriving a list of group members and assigning them to a variable

  • Now, you can simply type: $Members
 
Illustrates the output of members captured in the previous step using GetRelatedMonitoringObject(). Should show three headings and then the server members from the group

  • Or, pipe the command out to a file: $Members | Sort DisplayName | FT DisplayName | out-file C:\Scripts\Servers.txt
 
Illustrates running the following command in powershell to pipe a variable out to a file: $Members | Sort DisplayName | FT DisplayName | out-file C:\Scripts\Servers.txt


Friday, November 23, 2012

Using Monitors for Automated Disk Space Recovery

Thought I would do a new post today. It's the day after Thanksgiving and guess who drew the after-hours phone a monitoring ticket this week? So, bunch of disk space monitors came in and I decided I didn't want to have to respond to them, especially since I will have after-hours duties during Christmas as well, lucky me.

So the concept I'll illustrate here is to have SCOM take automated actions to clean-up drive space on its own, hopefully averting an impending disaster and the need for you to get up from your peaceful slumber, camping trip or whatever it is you do when you try to have a life outside of daily IT tasks.

As with any Microsoft product, there are about a dozen ways to do this. I give you probably the simplest way, but long term would probably be difficult to maintain in a large server environment. I'll improve on this and post any updates when I do.

First, let us start by creating a folder on the root drive of a target server. I called the folder "C:\Scripts". Create a batch file in the folder. I called mine "cleanup.bat"

System Center 2012 SCOM Disk Cleanup Script Folder


I have included the contents of the sample script. It is pretty basic, essentially clearing out temporary files in a variety of locations. This could certainly be expanded to remove old IIS or Blackberry log files, remove SQL backups, etc. Any action that can be scripted can essentially be run here.


del C:\Temp\*.* /s /q
del %Windir%\Temp /s /q
IF EXIST "C:\Users\" (
    for /D %%x in ("C:\Users\*") do (
        del /f /s /q "%%x\AppData\Local\Temp\"
        del /f /s /q "%%x\AppData\Local\Microsoft\Windows\Temporary Internet Files\"
    )
)
IF EXIST "C:\Documents and Settings\" (
    for /D %%x in ("C:\Documents and Settings\*") do (
        del /f /s /q "%%x\Local Settings\Temp\"
        del /f /s /q "%%x\Local Settings\Temporary Internet Files\"
    )
)
With the script loaded on the target server, go to your SCOM management console and navigate to the authoring tab and then select the "Monitors" option.


After the monitors all load, in th search field, type in "Logical Disk" to narrow the monitors. Once the search finishes, you can then select one of the Logical Disk Free Space monitors, such as Windows Server 2000, Windows Server 2003 or Windows Server 2008. I chose to alter the settings for the Windows Server 2008 Logical Disk Free Space monitor. Right-click on the Logical Disk Free Space monitor and select "Properties".


Navigate to the "Diagnostic and Recovery" tab. Here, we will want to add a recovery task. You can put in the same task for both warning and critical recovery tasks if you like.

In the "Recovery Task Type", select "Run Command" and change the destination management pack to either the default client overrides or an alternate management pack you might have for such customizations.

On the next section, give the recovery task a name that makes sense. You can choose to have the system recalculate the monitor. If disk space falls back into the norm, the alert will clear itself automatically.

On the last screen, enter the path on the target server where the script was located. As I outlined in the beginning, I put the scripts in the "C:\Scripts\" folder with a file called cleanup.bat.

You are basically done at this point. When the alert or warning condition occurs (which ever you setup to respond to), the script will kick off and delete the files.

The nice thing about running a recovery task in this manner is that if the alert persists, you know there is a larger problem as the basic steps of clearing up misc., temporary files has already been accomplished. Now you know there is something out of the ordinary going on.

You can now test this script by running a program called Philip 2.10. This will create a large file in one of the temporary directories cleared by the sample script. You can download the software from the following location:

http://www.softpedia.com/get/System/File-Management/Philip.shtml

Wednesday, May 23, 2012

SCOM - Putting Systems in Maintenance Mode through Citrix

One of the goals I have is to give the ability of application developers and other individuals the ability to put their systems into maintenance mode without necessarily having to access the Management Console directly or get me involved. When they do code updates or other system maintenance, it is handy to give them a quick and basic way to put their systems into maintenance. Additionally, there are times where it is nice to have the ability to put systems into maintenance mode from a cell phone, tablet or other device from a remote location, which is where Citrix comes in handy. Basically, I put the following code into a file and publish that script through Citrix to the users that may need it.

Here is the script:

# Enter the FQDN of your SCOM management server in this variable
$RMSFQDN = "my-managementserver.mydomain.internal"

# Enter the internal DNS suffix for your environment
$DNS = "mydomain.internal"

$Name = "Microsoft.EnterpriseManagement.OperationsManager.Client"

$ModuleLoaded = Get-Pssnapin $Name -ErrorAction SilentlyContinue

If (-not $ModuleLoaded)
{
add-pssnapin "Microsoft.EnterpriseManagement.OperationsManager.Client";
}

New-ManagementGroupConnection -ConnectionString $RMSFQDN
Set-Location "OperationsManagerMonitoring::";

$startTime = [System.DateTime]::Now

# You can change the default time for how long systems should be in maintenance
$Hours = 3

$endTime = $startTime.AddHours($Hours)

$comment = "Computer Maintenance"

While ( ($computerPrincipalName -ne "done") -or ($computerPrincipalName -ne "Done") )
{
 $computerClass = get-monitoringclass -name:Microsoft.SystemCenter.ManagedComputer
 $computerPrincipalName = Read-Host "Enter the computer name to put into maintenance (enter 'done' to finish maintenance mode)"
 $computerCriteria = "PrincipalName='" + $computerPrincipalName + "." + $DNS + "'"
 write-host $computerPrincipalName
 $computer = get-monitoringobject -monitoringclass:$computerClass -criteria:$computerCriteria

 if($computer -eq $null)
 {
  $unixClass = get-monitoringclass -name "Microsoft.Unix.Computer"
  $monObject = Get-MonitoringObject -monitoringclass:$unixClass
  $computer = $monObject | where {$_.displayname -eq $computerPrincipalName}
 }
 ELSE
 {
  $computerClass = get-monitoringclass -name:Microsoft.Windows.Computer
  $computer = get-monitoringobject -monitoringclass:$computerClass -criteria:$computerCriteria
 }
 if($computer.InMaintenanceMode -eq $false)
 {
  "Putting " + $computerPrincipalName + " into maintenance mode"
  New-MaintenanceWindow -startTime:$startTime -endTime:$endTime -comment:$comment -monitoringObject:$computer
 }
}
stop-process -Id $PID