Search This Blog

Thursday, December 27, 2012

Setup a Disk Report in SCOM 2012 (Part-3)

Finally got around to getting all the screen shots for the updated post for creating a more visually useful report. Now I don't have to make a new years resolution to get it done.

Recall in Part-2 of Setting up a Logical Disk Report for SCOM 2012 that a new view was created to make life a little easier. It was named “vCustomHourlyLogicalDiskPerf”. We will continue to use this view in the design of our updated, color-coded report. I was going to switch over to Visual Studio for this update, but decided to stick with Report Builder 3.0, which is a tool that comes with SQL or can be downloaded for free.

I will be more to the point with this post since I have covered other topics in parts one and two. Please refer back to those if you get stuck here. I presume you have already created the SQL view, which this post will utilize and was created earlier in Part-2.

Open Microsoft Report Builder 3.0 and connect to your SQL server housing the Operations Manager data warehouse. Start with a blank report project.

In the blank report, go ahead and resize out to about 8 inches for width.


Let’s add a quick title. For this, we’ll call it “Less than 10% Free Logical Disk Report”


Now let’s add the datasource:


Select the “Use a connection embedded in my report” and enter the connection string to DataWarehouseMain


data source=<SQL DW Server>;initial catalog=OperationsManagerDW;Integrated Security=SSPI

For the time being, change the credentials to “Use Current Windows User”. This will be changed after the report is complete, but use this for now in order to connect to the database and finish the report.

Now let us add a dataset:


We are going to do a slightly different dataset here than the one used in Part-2 of the series. For the purposes of this report, I want it to give me the status of disk space as of the last day. Since we’re trying to keep this simple and hack the code, we can run into accuracy issues with the construction of this report if more than one day of data is used. Additionally, I use this report each Friday so I know the disks that are currently having space issues so I can remediate the problems prior to the weekend and hopefully, avoid an outtage or after-hours call.

Here is the select statement for this dataset. Notice, I am hard coding the dates here. No variables will have to be used when this report runs. This makes it fast to use and easy to schedule. Notice some of the exclusions in the last section of the query. I am specifically removing the “total” metric, which can add redundant data. I also remove volume links that may be reported by services such as clustering or exchange, but effectively have the same data as the logical disk link. I could also exclude servers here that I know I don’t care about but that might have monitoring data, such as a backup server, video server, etc.

DECLARE @Start_Date DATETIME
DECLARE @End_Date DATETIME
SET @Start_Date = DateAdd(d,-1,GETDATE())
SET @End_Date = GETDATE()


select
[Total Disk Space],
[Free Megabytes],
[% Free Space],
InstanceName,
Path,
DateTime


from
(select CounterName, AverageValue,InstanceName, Path,DateTime
 FROM vCustomHourlyLogicalDiskPerf) AS SourceTable
PIVOT
(
AVG (AverageValue) FOR CounterName IN ([Total Disk Space],[Free Megabytes],[% Free Space])
) AS PivotTable

WHERE
DateTime >= @Start_Date AND
DateTime <= @End_Date AND
NOT InstanceName = '_Total' AND
NOT InstanceName Like '\\?\Volume%%' AND
[% Free Space] <= 10.00


With the query complete, let’s get the report up and running. This report will include a status bar to visually show the disk space left as well as color coding to show really critical space issues in red and warnings in orange.

Start by inserting a matrix into the report fields. Just drag and drop the matrix onto the report itself and then reposition to the upper-left, just under the title


Grab the “Path” variable from the dataset and drag to the lower left corner of the matrix:


Next, add a child group to the “Row Groups”:


Add the “Instance Name to the row child group”


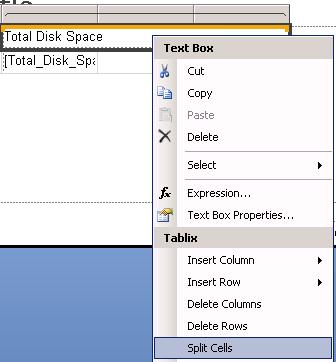
On the third, remaining column, select the top of the column and right-click to add another column within the group. This needs to be repeated four times.

 Should now have something that looks like this:


We’ll need to split the top header. Right click on the top header to bring up the context menu and select “Split Cells”


Now, in this order, drag and drop the total disk space, free disk space and % free metrics into the bottom of each column. Leave a space between “free disk space” Should look something like the following:


This isn’t very handy, since we don’t want the sum of these metrics. So we’ll want to adjust each field, starting with “Total Disk”, right click on the field and select the “expression” option.


Let’s change this to the actual value along with converting it into Gigabytes, from the default Megabytes.


Now do the same with free space.


For the next field, which is blank, we’ll call it used disk space Used (GB). Here, we’ll use a calculated field. We could have done this in the SQL query itself, but I chose to do this differently. The expression here should include the total disk space minus the free disk space.

=(Fields!Total_Disk_Space.Value-Fields!ID__Free_Space.Value)/1000


Then finally on to percent free space.


For this field, we are going to add a color coding mechanism.  Right click on the ID_Free_space and select the “Text Box Properties”


Navigate to Font, and select the expression applet next to color.


Add the following expression in the "Color" field


=IIF(Fields!ID__Free_Space.Value >= 10, "Green", IIF(Fields!ID__Free_Space.Value >= 5, "Orange", "Red"))

What this is saying is, any field greater than 10% free space will show up as green, otherwise, anything between 10 and 5 will turn orange and anything under 5 will turn red. If this report had not been limited already to items under 10%, it would have made the corresponding report much easier to figure out which items were critical.


Under the “Insert” menu item in the report builder, select “Gauge” and then select the lower-right, empty column, to insert the visual gauge for free space.


We’ll choose the “Bullet Graph” under linear gauges.


Double-click on the gauge and for the “LinearPointer1” values, select the “ID_Free_Space” field and then delete “LinearPointer2”. The gauge will also want to sum up the values. Go back to the expression and remove the SUM option.


For the gauge, we’ll want similar fill options to our numerical values. Select the small line in the gauge, then right-click and select the “Pointer Properties”.


Select the “Pointer Fill” option and adjust the expression for the “Color” and “Secondary Color” with the following expression.

=IIF(Fields!ID__Free_Space.Value >= 10, "Green", IIF(Fields!ID__Free_Space.Value >= 5, "Orange", "Red"))


Adjust the column widths and get things all squared up. Now your report should look something like this:


Now go back to the properties of DataWarehouseMain and change the credentials back to “Do not use Credentials”


Now save the report to the SCOM reporting server.


The report is almost ready to be completed and viewed. Login to the web interface of the report server.

Usually with the syntax of
http://<report server>/Reports.

Select the "Details View" and look for the DataWarehouseMain object and select it. Go into the object properties and copy the selection string. Now find the report you just created, and select the manage option in the drop down menu.


Go to the “Data Sources” tab for the report and delete the existing connection string and replace with the one copied from DataWarehouseMain. Also ensure that “Credentials are not required” is selected. Apply the changes.

You should now be able to run the report. Depending on the cleanup you did in the report format, you may need to go back and make some changes. In my example, I did not adjust the numerical formatting for each text field and ended up with too many decimals in the fields. So long as you are only changing text field properties, you should be able to save the report without altering any connection string settings.


To correct this, open a text box property, select the “Number” tab and change the format to “Number” with 2 decimal places.


Now the output looks like this, which is much better:


Good luck and happy report writing. There is a little bit of everything in this post and hopefully this helps get you started with additional techniques.

Monday, November 26, 2012

SCOM Exchange Management Pack Pitfall

Well this was certainly a fun one to track down. Again, being my week on call and it being a holiday, there was no rest for the wicked apparently. The problems actually surfaced earlier in the week but then reared their head again on Saturday. If you get into this situation, there will be what seems to be random issues with exchange, queues shutting down, mailboxes getting disconnected. All sorts of weird stuff. I'll explain more after the errors. Here are some of the error messages we started receiving in the email queue and the exchange event logs.

***************************************************
Alert: The database copy is very low on log volume space. The volume has reached critical levels.

Source: Database Copy (log) Logical Disk Space (D:\DB1) - <server> (Mailbox) -
 
Path: <server>; <server>(Mailbox) - Last modified by: System Last modified time: 11/24/2012 10:33:24 AM Alert description: TimeSampled: 2012-11-24T10:32:45.0000000-08:00

ObjectName: LogicalDisk

CounterName: % Free Space

InstanceName: D:\DB1

Value: 4

SampleValue: 11.9463672637939


***************************************************
Log Name:      Microsoft-Exchange-Troubleshooters/Operational
Source:        Database Space
Date:          11/23/2012 4:27:32 PM
Event ID:      5701
Task Category: (1)
Level:         Error
Keywords:      Classic
User:          N/A
Computer:     <servername>
Description:
The database space troubleshooter detected a low space condition on volume D:\DB1\ for database DB1. Provisioning for this database has been disabled. Database is under 16% free space.
***************************************************

Now let's pull the curtains back a bit and find out what's going on here. There are several things involved. First, Exchange 2010 has a powershell script called troubleshoot-databasespace.ps1. Without SCOM, this script would be called manually. The Exchange management pack, however, calls it automatically. More details can be found here - http://letsexchange.blogspot.com/2012/09/exchange-2010-sp1-added-new-script.html

Troubleshoot-databasespace.ps1 refers to a file that has the limits set to gauge the database health. Here are the default constants in the file, StoreTSConstants.ps1:

There were found in the \Exchange14\Scripts folder

# The percentage of disk space for the EDB file at which we should start quarantining users.
$PercentEdbFreeSpaceDefaultThreshold = 25
# The percentage of disk space for the logs at which we should start quarantining users.
$PercentLogFreeSpaceDefaultThreshold = 25
# The percentage of disk space for the EDB file at which we are at alert levels.
$PercentEdbFreeSpaceAlertThreshold = 16
# The percentage of disk space for the EDB file at which we are at critical levels.
$PercentEdbFreeSpaceCriticalThreshold = 8

So, in our case, we have a 600 Gb lun and were down to roughly 12% of our space, falling below the alert levels set by default, but still had 72Gb of storage left. So exchange went into alert mode. We started receiving issues of users not being able to connect to exchange or unable to send messages but still able to receive them. Very strange stuff. I changed the values to start alerting at 5% and then put the servers in maintenance mode to get over the immediate issue.

So, don't get caught in the Exchange Management Pack trap. Ensure you set these levels to something that makes sense. Unlike the SCOM disk alerts that have a two factor calculation mechanisms, this is the old-fashioned percentage calculation, making it very easy to get bit on large volumes. The other option is that you turn off these monitors. Given the space monitoring is somewhat redundant with the SCOM disk space alerts, that may be a safer alternative.


Friday, November 23, 2012

Using Monitors for Automated Disk Space Recovery

Thought I would do a new post today. It's the day after Thanksgiving and guess who drew the after-hours phone a monitoring ticket this week? So, bunch of disk space monitors came in and I decided I didn't want to have to respond to them, especially since I will have after-hours duties during Christmas as well, lucky me.

So the concept I'll illustrate here is to have SCOM take automated actions to clean-up drive space on its own, hopefully averting an impending disaster and the need for you to get up from your peaceful slumber, camping trip or whatever it is you do when you try to have a life outside of daily IT tasks.

As with any Microsoft product, there are about a dozen ways to do this. I give you probably the simplest way, but long term would probably be difficult to maintain in a large server environment. I'll improve on this and post any updates when I do.

First, let us start by creating a folder on the root drive of a target server. I called the folder "C:\Scripts". Create a batch file in the folder. I called mine "cleanup.bat"

System Center 2012 SCOM Disk Cleanup Script Folder


I have included the contents of the sample script. It is pretty basic, essentially clearing out temporary files in a variety of locations. This could certainly be expanded to remove old IIS or Blackberry log files, remove SQL backups, etc. Any action that can be scripted can essentially be run here.


del C:\Temp\*.* /s /q
del %Windir%\Temp /s /q
IF EXIST "C:\Users\" (
    for /D %%x in ("C:\Users\*") do (
        del /f /s /q "%%x\AppData\Local\Temp\"
        del /f /s /q "%%x\AppData\Local\Microsoft\Windows\Temporary Internet Files\"
    )
)
IF EXIST "C:\Documents and Settings\" (
    for /D %%x in ("C:\Documents and Settings\*") do (
        del /f /s /q "%%x\Local Settings\Temp\"
        del /f /s /q "%%x\Local Settings\Temporary Internet Files\"
    )
)
With the script loaded on the target server, go to your SCOM management console and navigate to the authoring tab and then select the "Monitors" option.


After the monitors all load, in th search field, type in "Logical Disk" to narrow the monitors. Once the search finishes, you can then select one of the Logical Disk Free Space monitors, such as Windows Server 2000, Windows Server 2003 or Windows Server 2008. I chose to alter the settings for the Windows Server 2008 Logical Disk Free Space monitor. Right-click on the Logical Disk Free Space monitor and select "Properties".


Navigate to the "Diagnostic and Recovery" tab. Here, we will want to add a recovery task. You can put in the same task for both warning and critical recovery tasks if you like.

In the "Recovery Task Type", select "Run Command" and change the destination management pack to either the default client overrides or an alternate management pack you might have for such customizations.

On the next section, give the recovery task a name that makes sense. You can choose to have the system recalculate the monitor. If disk space falls back into the norm, the alert will clear itself automatically.

On the last screen, enter the path on the target server where the script was located. As I outlined in the beginning, I put the scripts in the "C:\Scripts\" folder with a file called cleanup.bat.

You are basically done at this point. When the alert or warning condition occurs (which ever you setup to respond to), the script will kick off and delete the files.

The nice thing about running a recovery task in this manner is that if the alert persists, you know there is a larger problem as the basic steps of clearing up misc., temporary files has already been accomplished. Now you know there is something out of the ordinary going on.

You can now test this script by running a program called Philip 2.10. This will create a large file in one of the temporary directories cleared by the sample script. You can download the software from the following location:

http://www.softpedia.com/get/System/File-Management/Philip.shtml

Wednesday, October 24, 2012

Monitoring HP Servers Running VMWare (Intro)

Up until now, we have had a definitely challenge in working to get our HP VMware servers actively monitored at the hardware level in SCOM. Last month, HP introduced a new series of management packs. The downside is, they require the SNMP services to be running in order to pick up agentless and VMWare based systems. We'll see how that affects SNMP capabilities in SCOM as there had been instructions to disable those services. More to come on these updates.

Tuesday, August 21, 2012

Retrieving a List of Monitored SQL Databases and Database Files

Here is a tid-bit of housekeeping information. Our DBA wanted to know how many databases were floating around out there. I realized, there didn't seem to be a consolidated report that showed all SQL 2000, 2005 and 2008 instances. Most reports are segmented by SQL version and still don't really show all this information in a quick list. I concocted a couple of queries that pry that information out of the System Center Database. Try them out!

Open up SQL Management studio, connect to the SQL server running your System Center databases and give these queries a shot:


Use OperationsManager

Select *

From ManagedEntityGenericView

Where FullName Like '%SQLServer.Database%' AND

NOT FullName Like '%Exchange%' AND

MonitoringClassId = '10C1C7F7-BA0F-5F9B-C74A-79A891170934'

ORDER By Path


If nothing is returned, try removing the filter for the Monitoring ClassId

------------------------------------------------------------------------------------------


Use OperationsManager

Select *

From ManagedEntityGenericView

Where FullName Like '%DBFile:%' AND

NOT FullName Like '%Exchange%'

ORDER By Id

Wednesday, August 1, 2012

Australia

If anyone would like some help on a project in Australia, I would love a reason to come out there, just saying :)

Friday, July 20, 2012

Background Intelligent Transfer Service is Missing

After my niece used my computer this week, I came home to discover my system infected with a nasty virus that deleted the windows update service along with the Background Intelligent Transfer Service along with all sorts of other nasty things. This has nothing to do with System Center, but thought I would log it anyway since I had to create the service manually after an automated fix from Microsoft failed to restore the service to a functional state and I found no love in other forums.
First, check this link, it may help:
http://support.microsoft.com/kb/971058/en-us

From an Administrative command prompt, type the following to restore BITS (Background Intelligent Transfer Service)

sc create BITS type= share start= delayed-auto binPath= "C:\Windows\System32\svchost.exe -k netsvcs" tag= no DisplayName= "Background Intelligent Transfer Service"

There should be trailing spaces right after the equal signs. The service registered successfully and picked up the dependencies as well without having to add those manually. The service is dependent on RPCSs and EventSystem in the event you do have to add those.

Wednesday, July 18, 2012

Setup a Disk Report in SCOM 2012 - (Part 2)

Now that we've started collecting disk space counters for logical drives in Part 1 of this series, let's whip together a quick report that shows the logical disk size, the logical disk space free and logical disk space used.

I am going to start by saying some of the tactics in here are likely not Microsoft supported, but they work. Before you make changes, ensure you have the previous settings written down somewhere and your data backed up. While I have not encountered any issues with this procedure, I suppose something could happen that I have not seen in the environments I manage.

There are also a few other ways of accomplishing the report writing, such as using Visual Studio. I wanted to use only free tools that are readily available for this exercise. The driving piece of this is getting access to the performance data. That has been a challenge for myself and many others out there. After this, you will be better prepared to pull a variety of performance metrics from your system in the way you want.

Saban's blog was able to point me to the location of the tables used for the performance data and he uses the Visual Studio method for creating the report. Lot of good information in his blog. Ultimately, I chose a different SQL query method to make it easier (in my opinion) working with the data.

http://skaraaslan.blogspot.com/2011/02/creating-custom-report-for-scom-2007-r2.html

  1. Go ahead and connect to the SQL server running the OperationsManagerDW database using the SQL Management Studio. If you don't have the SQL management studio on your desktop then you may want to terminal into your database server and connect from there.

  2. When connecting, enter the SQL server name housing your OperationsManagerDW database.

  3. Once in the SQL Management Studio, browse through the tree to the OperationsManagerDW view tab, where you will right-click on "Views" and select "New View".

  4. A box will appear that allows you to grab specific tables or views to add for the query designer. Go ahead and just close this window.


  5. You will then be presented with a three pane window, the fields should be blank. Post the following SQL statements into the bottom pane (replacing any existing information), after which the view should look like the image following the SQL statements. This view will filter the results to only show the logical disk counters. You could leave the filter out so that you can use this view to poll any performance data. For now, use these statements to only look for LogicalDisk metrics.


  6. SELECT    

    Perf.vPerfHourly.AverageValue,
    dbo.vPerformanceRuleInstance.InstanceName,
    dbo.vPerformanceRule.ObjectName,
    dbo.vPerformanceRule.CounterName,                       dbo.vPerformanceRuleInstance.LastReceivedDateTime,
    Perf.vPerfHourly.DateTime,
    dbo.vManagedEntity.DWCreatedDateTime,
    dbo.vManagedEntity.ManagedEntityGuid,
    dbo.vManagedEntity.ManagedEntityDefaultName,
    dbo.vManagedEntity.DisplayName,
    dbo.vManagedEntity.Name,
    dbo.vManagedEntity.Path,
    dbo.vManagedEntity.FullName

    FROM        

    Perf.vPerfHourly INNER JOIN dbo.vPerformanceRuleInstance ON Perf.vPerfHourly.PerformanceRuleInstanceRowId = dbo.vPerformanceRuleInstance.PerformanceRuleInstanceRowId INNER JOIN dbo.vManagedEntity ON Perf.vPerfHourly.ManagedEntityRowId = dbo.vManagedEntity.ManagedEntityRowId INNER JOIN dbo.vPerformanceRule ON dbo.vPerformanceRuleInstance.RuleRowId = dbo.vPerformanceRule.RuleRowId


    WHERE     (dbo.vPerformanceRule.ObjectName = 'Logicaldisk')

  7. Run the query just to make sure data is getting polled correctly. If not, check to ensure everything has copied and pasted correctly and that the OperationsManagerDW database is selected to run the query against. After the query runs successfully, save the view.


  8. When the save dialog appears, use the name as shown, as the remainder of this tutorial will be based on this view. Otherwise, remember to change the references to this name with the one you input. The query could also be changed to reflect daily information. Simply go back to the select statement above and change the joins to include Perf.vPerfDaily instead of Perf.vPerfHourly


  9. At this point, we need to make an adjustment to the reporting service. Open the "Reporting Services Configuration Manager" and select the "Execution Account". Take note of the account used here.

  10. Now open the web management console for the SQL Reporting Server that runs your SCOM reports and select the detailed view in the report manager screen. Look for the Data Warehouse Main data source. Hovering over the entry should bring up a drop down menu, select that and click manage to open the properties of the Data Warehouse Main data connection.

  11. Go to the "Connect String" properties of the data connector and input the execution account credentials in this spot and save the changes.

  12. Now you will want to download the Microsoft SQL Server 2008 R2 Report Builder 3.0 software, http://www.microsoft.com/en-us/download/details.aspx?id=6116 (If you do not have SQL 2008 R2 installed, then download Microsoft SQL Server Report Builder 2.0. Report Builder 3.0 only works with SQL 2008 R2)


  13. Once downloaded and installed, open the report builder and select the "Blank Report" option. You may be promopted for a login to the report server. You should be able to use your local credentials. If those do not work, you may need additional rights to login to the SQL server with your account.
  14. Logical Disk Used Space Report Builder

  15. Once in the "Blank Report", you will need to add a data source. Browse through the tree view on the left and right-click ont he "Data Source" folder to add a Data Source.

  16. From here you should be able to browse the datasources installed on the report server. The Data Warehouse Main connection should be found by browsing.

  17. With a datasource setup, you need to now add a dataset to pull the data. Browse the tree 5o "Datasets" and right-click to add a new dataset.

  18. In the "Dataset Properties", under the "Query" section, input the following code:

  19. select
    [Total Disk Space],
    [Free Megabytes],
    [Total Disk Space]-[Free Megabytes] AS "Used Space",
    InstanceName,
    Path,
    DateTime from
    (
    select
    CounterName,
    AverageValue,
    InstanceName,
    Path,
    DateTime

    FROM vCustomHourlyLogicalDiskPerf) AS SourceTable PIVOT ( AVG (AverageValue) FOR CounterName IN ([Total Disk Space],[Free Megabytes])
    ) AS PivotTable

    WHERE
    DateTime >= @Start_Date AND
    DateTime <= @End_Date AND
    NOT InstanceName = '_Total' AND
    NOT InstanceName Like '\\?\Volume%%'

    Alternatively, if you didn't setup or want to setup the WMI counters for logical disk size, you can extrapolate the information with the following query:

    select
    [Free Megabytes],
    [% Free Space],
    [Free Megabytes]/([% Free Space]/100) AS "Total Disk Space",
    ([Free Megabytes]/([% Free Space]/100) - [Free Megabytes]) AS "Used Disk Space",
    InstanceName,
    Path,
    DateTime
    from
    (select CounterName, AverageValue,InstanceName, Path,DateTime
     FROM vCustomHourlyLogicalDiskPerf) AS SourceTable
    PIVOT
    (
    AVG (AverageValue) FOR CounterName IN ([Free Megabytes],[% Free Space])
    ) AS PivotTable
    WHERE
    DateTime >= '7/17/2012' AND
    DateTime <= '7/18/2012' AND
    NOT InstanceName = '_Total' AND
    NOT InstanceName Like '\\?\Volume%%' AND
    [% Free Space] > 0.000001


  20. After saving the dataset, you should see the variables for the dataset apear in the left-hand pane.

  21. In the Report Builder menu at the top, select "Insert" and select the down arrow under "Matrix" to manually insert a matrix table.

  22. You should be presented with a two row, two column matrix table. Start by dragging the "Path" variable to the lower-left box.

  23. Now click on the box with the [path] variable, right-click to bring up the context menu and browse down to "Add Group" and select a "Child Group" for the row.

  24. This will bring up a "Tablix group" dialog box. Select the [InstanceName] variable for this group.

  25. In the lower-right column, drag the [Total_Disk_Space] Variable to the box. This will want to change the value to the sum of all values. Right-click the field to bring up the expression option.

  26. Take out the SUM() calculation to leave just the "Total Disk Space" option.

  27. In the same column, right-click for the context menu and now lets select "Insert Column - Inside Group - > Right". Do this again to add another column.

  28. Select the top header, right-click for the context menu and select the option to "Split cells". Now you can drag the [Free_Megabytes] variable to the next to last column and the [Used_Space] to the last column.

  29. Your report should now look something close to this, two rows and five columns, each with unique variables and headers.
  30. Logical Disk Used Space Finished Report

  31. Once you run the report and can see the data, go ahead and save the report directly to the SCOM Report Server. If you select the "My Reports" folder, your report will show in the reports page under "Authored Reports"


This is a super basic, excel like report. In Part-3, we'll take a stab at adding some graphics and formatting the output for Gigabytes, instead of Megabytes, use commas  and only two decimal places for the output of the data. By using custom views, you can aggregate a lot of information to query more easily later and with much simpler SQL statements. Those views may get delted during an update, so that is something to keep in mind, since it is a bit of a hack. If you find that you're missing data, you may want to up your collection interval for the devices or check for WMI connection errors on the servers you are collecting WMI performance data agains from Part-1.